Rapid Prototyping in Software Development
27 Feb 2020
by Lotte, Digital Content Specialist
27 Feb 2020
by Lotte, Digital Content Specialist
Rapid Prototyping in Software Development
Table of contents
Contact us
We will get back to you in the next 48 hours.

Next to wireframes and mockups, prototypes are the final and possibly most important elements within the process of software conceptualization and development.
Intro
Not too long ago, we wrote an article on UI/UX design, and the elements that are involved in the process of software development. One of these elements is prototyping, which entails the iterative development and delivery of a very basic version of your client’s end-product. With prototypes you can give end-users the opportunity to interact with the overall look and feel of the software, which offers the opportunity for users to validate and give feedback on specific features and processes. This way, you maximise the value of a product, and make sure it’s tailored to the needs of the end-user. Because we think prototyping on its own deserves a place in the spotlights, this article dives deeper into the process of prototyping, and rapid/agile prototyping in particular.
Wireframes, mockups, prototypes
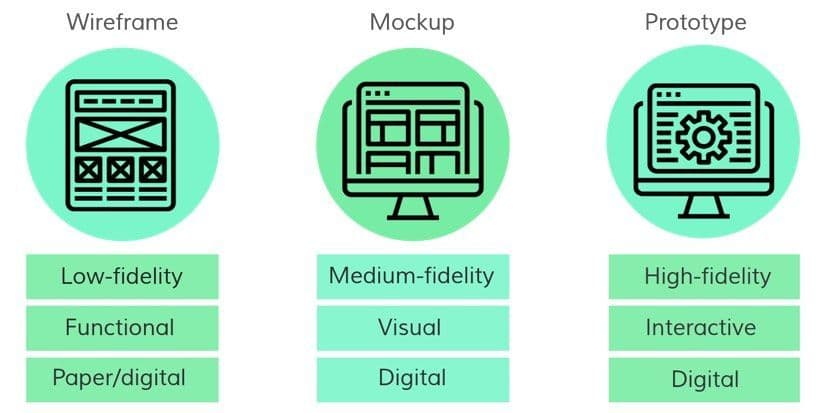
Before the process of designing an aesthetically pleasing and functional interface begins, you’ll need a proper framework on which you build your design. The first steps towards a successful design exist entirely of wireframes, mockups, and prototypes. Yes, wireframes, mockups, and prototypes are three separate and quite different processes, against common belief. The main difference between a wireframe, a mockup, and a prototype is the fidelity and how much the draft looks and functions like the actual end-product. Here’s what you need to know about the main differences and functionalities of wireframes, mockups, and prototypes.
Wireframes
Generally speaking, wireframing is low-fidelity. This means that a wireframe is a very simplified outline of the end-product, which mainly consists of a basic blueprint of an end-product’s functionalities and looks. It’s all lines, squares, circles, and arrows, but nothing to interact with or to physically try out - sometimes something as simple as a sketch on graph paper. The iterative testing phase of wireframes is much quicker and agile than with prototypes. Because a wireframe is so basic and non-interactive, it’s easier to make and adjust over and over again, based on your client’s or end-users’ feedback. It’s also easier than the process of mockups, as there’s no need for images or other content to fill in the gaps.
Mockups
To take it a step further than the basic blueprinting of wireframes, there’s another element in the iterative design process: mockups. Mockups are wireframes, but with a few extra layers of design over it, like images, labels, basic text, and other content. It’s right in between a wireframe and a prototype, where the overall design is very close to how the end-product is supposed to look like, but there are still no interactive functionalities. Mockups possess the skeleton of the wireframe, but with some more body and a basic skin to give the screens more context. It’s generally the most efficient way to show your client a design, without having to put too much effort into implementing minor changes and adjustments, based on your client’s feedback. Ultimately, a mockup gives your client solid insight into how the end-product will look, without any interactivity.
Prototypes
A prototype takes a mockup to the next level with the element of interactivity. With a medium- to high-fidelity visual, prototypes are closer to what the end-product will look like and function. It’s the skeleton of a wireframe, the muscles and skin of the mockup, but then adds a system of functioning organs, blood vessels, and nerves. Generally, a prototype is a functional and dynamic basic version of the end-product. But keep in mind, we’re still in the phase of UI/UX design. A prototype might look and function like the end-product, but there is no actual written and working code behind it. Because prototypes are interactive, it takes more time to create and adjust the design than wireframes and mockups.
In order to prevent big and time consuming changes and adjustments within the phase of prototyping, it’s essential to have your designs on point during the wireframe and mockup phase. The prototype phase exists mainly for testing out the key functions and your unique selling propositions (USPs) and how the design interacts with these functions, rather than solely focusing on design features on itself. That means that prototypes are a product of UX (User Experience) design, whereas mockups are focused on UI (User Interface) design.
Prototyping vs rapid prototyping
Now that you have an insight into the basic structures of wireframes, mockups, and prototypes, we can take it all to the next level with prototyping. Do you want to improve your software development process from “quite efficient” to “super quick and successful”? Then you might be interested in changing your process of just normal prototyping to what tech-savvy people call “rapid” or “agile” prototyping. It’s prototyping, but fast! And… Guess what? The actual difference between prototyping and rapid prototyping is... pretty much non-existent. The entire idea behind rapid prototyping is based on being agile, quick, and efficient. Prototypes are used for loops of creating, testing, reflecting, and readjusting. Because there are moments of user feedback before the actual investment of money and effort, it’s a much faster and time- and cost-efficient process than the often used alternative: the Waterfall method. Waterfall entails a process where each step, from ideation to design, is finalized before going to the next step. If you eventually come up with a finalized design, and a client changes his/her mind about a detail you implemented during the first steps, it’s going to be much more difficult to make changes in that fixed design. It’s like pulling away a fundamental support beam from under a roof to replace it with another. You might risk the entire building to become unstable, or worse: collapse - at the very least, it’s going to be a lot more expensive and complex than had you not built the roof yet! In that sense, iterative prototyping is much more flexible, as specific choices made in the first stages are constantly being tested and adjusted, in order to fit new implementations made in later stages. So, now we have the misconception of a difference between prototyping and rapid prototyping out of the way, let’s look at the actual process of prototyping, and what makes it so efficient.
The agile process of prototyping (step-by-step)
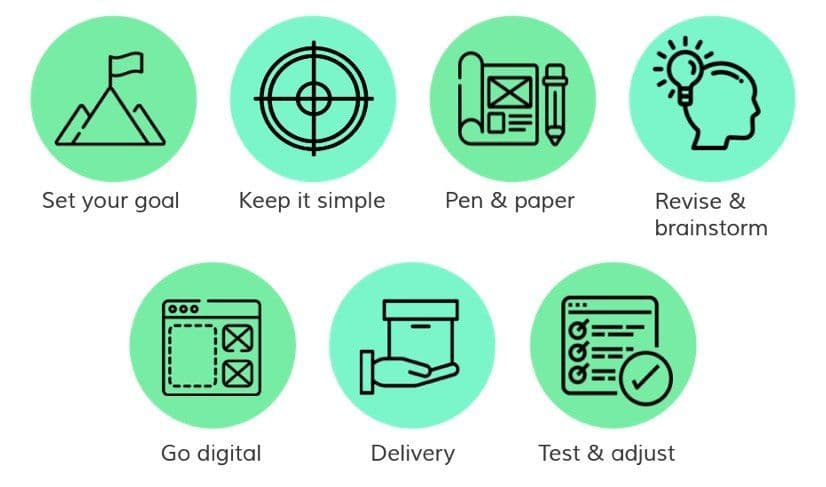
The entire process of prototyping can be divided into seven steps, from brainstorming to delivery and feedback. Because the process is agile and iterative, it’s hard to pinpoint a beginning and an end. Before you end up inside a vicious circle of readjusting and redesigning, discuss the possibilities and limits with your client. It’s crucial to set boundaries from the start, from technical to financial, to avoid disappointment later on.
Step 1: Define the goal of the project
One of the first and most essential steps in creating a clear goal for your project is brainstorming with your client while putting the end-user of your product central. What do they need? How can we realize that into a high-quality piece of software? Especially within an iterative and agile development process, you work together with your client, rather than just creating a product for your client, deliver it, and never look back. Mutual understanding is key in order to end up with a concrete plan and basis for your prototype. Besides asking your client, make sure you also have a direct insight in the end-users’ needs by involving them in the phase of defining as well. After all, these are the people who will eventually use your product. It’s best to decide on a few key features in the beginning by creating a product Backlog, instead of trying to fit it into your design later on. A product Backlog consists of a list with items (User Stories) that have to be carried out during the development phase of a product. On top of that list are a few of the most important key items needed for developing your product.
Step 2: Keep it simple
By deciding these key features in your product Backlog, keep in mind to stick to the basics. What functionalities are most important for your and your client’s end-user? Take about two or three of these features as focus points, rather than cramming up your plan with fifteen different functionalities of high priority. Because prototypes are flexible and malleable, it’s not that much of a big deal to add features with a lower priority later on. It’s the Lean Startup way: start small, gather user feedback, and continuously improve. If your client wants a piece of software that’s focused on, for example, online dating, make sure your focus lays on essential features like detailed user profiles, and a user-friendly and easy-to-use chat feature. Keep it simple, the rest will come later on.
Step 3: Start with your design on paper
Like step 2 already suggested: keep it simple. Grab some pencils, a ruler, an eraser, and start your design on a piece of paper, rather than immediately turning to your go-to digital prototyping applications. Most wireframes come to life on a piece of paper before they are being implemented digitally. Not only is it quite relaxing to avoid that computer screen for a few hours and scribble and sketch around on some paper, it’s also limitless regarding design possibilities. Many applications have limited access to specific tools, and with just a pencil and paper you have no boundaries. You can see this phase the wireframing phase in the process of working towards an interactive prototype.
Step 4: Brainstorm with colleagues and potential end-users, and improve
Once you’ve managed to scribble down a decent basic design, discuss it with your colleagues, or even some friends or family. Explain the goal of your project and ask them for feedback. After all, the software you’re creating will probably be used by people like your friends, family, and colleagues, so they probably have a pretty good idea of how to make your design user-friendly and attractive. Because prototyping is all about working together with your client, it’s also essential to discuss your sketches with the client before you decide to move on.
Step 5: Go digital
Once you have a pretty clear image of how you and your client want the project to look like, you can start taking your design to the digital spheres. There’s loads of useful tools you can use for prototyping, from very extensive and pricy, to basic and budget-friendly or even for free. In our post on tools for efficient prototyping you can take a look at some of them, and see which one fits your project best.
Step 6: Delivery
Once your paper wireframes are transformed into a beautiful piece of interactive design, including images, textual content, and functional buttons, it’s time to present the product to your client for feedback. Keep in mind that this is just a prototype, so it won’t hit the needle on its head, or your visions are perfectly aligned with your client’s wishes, which isn’t likely. Even the best painters in history have been scribbling endlessly on their canvas, trying to reach perfection. Unfortunately, perfection is very subjective, so something that seems perfect to you, could look like a mess in the eyes of your client.
Step 7: Testing and adjusting
Brace yourselves, as it’s very rare to immediately hit the jackpot with your first design. If you’re lucky, the end-user/client will return with some small questions and adjustments. If not, you probably haven’t been communicating well enough with your client during the first steps of your prototyping process. Take a deep breath, communicate with your client, and go back to step 5 to make some small adjustments. It could be that your client has changed his/her mind on something big, which means you probably have to go back to your piece of paper and pencil and redraw a big part, before you start to mess with your digital design.
Prototyping at Lizard Global
At Lizard Global we strive to be as Agile as possible, and iterative prototyping and testing during our conceptualization and app/web development processes is an indispensable part of that. Because we highly value the input of our clients and their application’s end-users, we make sure that there’s enough space for continuous testing, reviewing, and feedback. When we define a feature to design, we use a MVF approach (Minimally Viable Feature). This means that we look at the minimum requirements needed for a specific feature, and design just that. Once implemented and live, we gather end-user feedback and improve that feature based on users’ experience. In order to achieve quality, there’s a need for quantity, and implementing a MVF approach or creating interactive prototypes are feasible ways to achieve an iterative process towards a successful user-centred end-product. We walk through the entire process of conceptualization, in which we define, measure, and validate a concept together with the stakeholders and audience using prototypes. This way, we aim to create innovative, sustainable, and scalable software that’s continuously adaptable to the changing needs and demands of our clients and end-users. Our clickable demos and wireframes are easy to create and adapt, which we do together with our client and end-users. This forms a powerful and unique co-creating atmosphere among all stakeholders, and guarantees an end-product that’s tailored to and aligned with the vision of our clients and users. Within our rapid prototyping processes, we combine our MVF approach with iterative A/B testing to measure the effects of our products among two groups of users in order to get a concrete idea of what works, what needs improvement, and what new features are needed. Rapid prototyping leads to rapid application development (RAD), which allows us to quickly and efficiently add value following our Agile way of working.
Next to wireframes and mockups, prototypes are the final and possibly most important elements within the process of software conceptualization and development.
Intro
Not too long ago, we wrote an article on UI/UX design, and the elements that are involved in the process of software development. One of these elements is prototyping, which entails the iterative development and delivery of a very basic version of your client’s end-product. With prototypes you can give end-users the opportunity to interact with the overall look and feel of the software, which offers the opportunity for users to validate and give feedback on specific features and processes. This way, you maximise the value of a product, and make sure it’s tailored to the needs of the end-user. Because we think prototyping on its own deserves a place in the spotlights, this article dives deeper into the process of prototyping, and rapid/agile prototyping in particular.
Wireframes, mockups, prototypes
Before the process of designing an aesthetically pleasing and functional interface begins, you’ll need a proper framework on which you build your design. The first steps towards a successful design exist entirely of wireframes, mockups, and prototypes. Yes, wireframes, mockups, and prototypes are three separate and quite different processes, against common belief. The main difference between a wireframe, a mockup, and a prototype is the fidelity and how much the draft looks and functions like the actual end-product. Here’s what you need to know about the main differences and functionalities of wireframes, mockups, and prototypes.
Wireframes
Generally speaking, wireframing is low-fidelity. This means that a wireframe is a very simplified outline of the end-product, which mainly consists of a basic blueprint of an end-product’s functionalities and looks. It’s all lines, squares, circles, and arrows, but nothing to interact with or to physically try out - sometimes something as simple as a sketch on graph paper. The iterative testing phase of wireframes is much quicker and agile than with prototypes. Because a wireframe is so basic and non-interactive, it’s easier to make and adjust over and over again, based on your client’s or end-users’ feedback. It’s also easier than the process of mockups, as there’s no need for images or other content to fill in the gaps.
Mockups
To take it a step further than the basic blueprinting of wireframes, there’s another element in the iterative design process: mockups. Mockups are wireframes, but with a few extra layers of design over it, like images, labels, basic text, and other content. It’s right in between a wireframe and a prototype, where the overall design is very close to how the end-product is supposed to look like, but there are still no interactive functionalities. Mockups possess the skeleton of the wireframe, but with some more body and a basic skin to give the screens more context. It’s generally the most efficient way to show your client a design, without having to put too much effort into implementing minor changes and adjustments, based on your client’s feedback. Ultimately, a mockup gives your client solid insight into how the end-product will look, without any interactivity.
Prototypes
A prototype takes a mockup to the next level with the element of interactivity. With a medium- to high-fidelity visual, prototypes are closer to what the end-product will look like and function. It’s the skeleton of a wireframe, the muscles and skin of the mockup, but then adds a system of functioning organs, blood vessels, and nerves. Generally, a prototype is a functional and dynamic basic version of the end-product. But keep in mind, we’re still in the phase of UI/UX design. A prototype might look and function like the end-product, but there is no actual written and working code behind it. Because prototypes are interactive, it takes more time to create and adjust the design than wireframes and mockups.
In order to prevent big and time consuming changes and adjustments within the phase of prototyping, it’s essential to have your designs on point during the wireframe and mockup phase. The prototype phase exists mainly for testing out the key functions and your unique selling propositions (USPs) and how the design interacts with these functions, rather than solely focusing on design features on itself. That means that prototypes are a product of UX (User Experience) design, whereas mockups are focused on UI (User Interface) design.
Prototyping vs rapid prototyping
Now that you have an insight into the basic structures of wireframes, mockups, and prototypes, we can take it all to the next level with prototyping. Do you want to improve your software development process from “quite efficient” to “super quick and successful”? Then you might be interested in changing your process of just normal prototyping to what tech-savvy people call “rapid” or “agile” prototyping. It’s prototyping, but fast! And… Guess what? The actual difference between prototyping and rapid prototyping is... pretty much non-existent. The entire idea behind rapid prototyping is based on being agile, quick, and efficient. Prototypes are used for loops of creating, testing, reflecting, and readjusting. Because there are moments of user feedback before the actual investment of money and effort, it’s a much faster and time- and cost-efficient process than the often used alternative: the Waterfall method. Waterfall entails a process where each step, from ideation to design, is finalized before going to the next step. If you eventually come up with a finalized design, and a client changes his/her mind about a detail you implemented during the first steps, it’s going to be much more difficult to make changes in that fixed design. It’s like pulling away a fundamental support beam from under a roof to replace it with another. You might risk the entire building to become unstable, or worse: collapse - at the very least, it’s going to be a lot more expensive and complex than had you not built the roof yet! In that sense, iterative prototyping is much more flexible, as specific choices made in the first stages are constantly being tested and adjusted, in order to fit new implementations made in later stages. So, now we have the misconception of a difference between prototyping and rapid prototyping out of the way, let’s look at the actual process of prototyping, and what makes it so efficient.
The agile process of prototyping (step-by-step)
The entire process of prototyping can be divided into seven steps, from brainstorming to delivery and feedback. Because the process is agile and iterative, it’s hard to pinpoint a beginning and an end. Before you end up inside a vicious circle of readjusting and redesigning, discuss the possibilities and limits with your client. It’s crucial to set boundaries from the start, from technical to financial, to avoid disappointment later on.
Step 1: Define the goal of the project
One of the first and most essential steps in creating a clear goal for your project is brainstorming with your client while putting the end-user of your product central. What do they need? How can we realize that into a high-quality piece of software? Especially within an iterative and agile development process, you work together with your client, rather than just creating a product for your client, deliver it, and never look back. Mutual understanding is key in order to end up with a concrete plan and basis for your prototype. Besides asking your client, make sure you also have a direct insight in the end-users’ needs by involving them in the phase of defining as well. After all, these are the people who will eventually use your product. It’s best to decide on a few key features in the beginning by creating a product Backlog, instead of trying to fit it into your design later on. A product Backlog consists of a list with items (User Stories) that have to be carried out during the development phase of a product. On top of that list are a few of the most important key items needed for developing your product.
Step 2: Keep it simple
By deciding these key features in your product Backlog, keep in mind to stick to the basics. What functionalities are most important for your and your client’s end-user? Take about two or three of these features as focus points, rather than cramming up your plan with fifteen different functionalities of high priority. Because prototypes are flexible and malleable, it’s not that much of a big deal to add features with a lower priority later on. It’s the Lean Startup way: start small, gather user feedback, and continuously improve. If your client wants a piece of software that’s focused on, for example, online dating, make sure your focus lays on essential features like detailed user profiles, and a user-friendly and easy-to-use chat feature. Keep it simple, the rest will come later on.
Step 3: Start with your design on paper
Like step 2 already suggested: keep it simple. Grab some pencils, a ruler, an eraser, and start your design on a piece of paper, rather than immediately turning to your go-to digital prototyping applications. Most wireframes come to life on a piece of paper before they are being implemented digitally. Not only is it quite relaxing to avoid that computer screen for a few hours and scribble and sketch around on some paper, it’s also limitless regarding design possibilities. Many applications have limited access to specific tools, and with just a pencil and paper you have no boundaries. You can see this phase the wireframing phase in the process of working towards an interactive prototype.
Step 4: Brainstorm with colleagues and potential end-users, and improve
Once you’ve managed to scribble down a decent basic design, discuss it with your colleagues, or even some friends or family. Explain the goal of your project and ask them for feedback. After all, the software you’re creating will probably be used by people like your friends, family, and colleagues, so they probably have a pretty good idea of how to make your design user-friendly and attractive. Because prototyping is all about working together with your client, it’s also essential to discuss your sketches with the client before you decide to move on.
Step 5: Go digital
Once you have a pretty clear image of how you and your client want the project to look like, you can start taking your design to the digital spheres. There’s loads of useful tools you can use for prototyping, from very extensive and pricy, to basic and budget-friendly or even for free. In our post on tools for efficient prototyping you can take a look at some of them, and see which one fits your project best.
Step 6: Delivery
Once your paper wireframes are transformed into a beautiful piece of interactive design, including images, textual content, and functional buttons, it’s time to present the product to your client for feedback. Keep in mind that this is just a prototype, so it won’t hit the needle on its head, or your visions are perfectly aligned with your client’s wishes, which isn’t likely. Even the best painters in history have been scribbling endlessly on their canvas, trying to reach perfection. Unfortunately, perfection is very subjective, so something that seems perfect to you, could look like a mess in the eyes of your client.
Step 7: Testing and adjusting
Brace yourselves, as it’s very rare to immediately hit the jackpot with your first design. If you’re lucky, the end-user/client will return with some small questions and adjustments. If not, you probably haven’t been communicating well enough with your client during the first steps of your prototyping process. Take a deep breath, communicate with your client, and go back to step 5 to make some small adjustments. It could be that your client has changed his/her mind on something big, which means you probably have to go back to your piece of paper and pencil and redraw a big part, before you start to mess with your digital design.
Prototyping at Lizard Global
At Lizard Global we strive to be as Agile as possible, and iterative prototyping and testing during our conceptualization and app/web development processes is an indispensable part of that. Because we highly value the input of our clients and their application’s end-users, we make sure that there’s enough space for continuous testing, reviewing, and feedback. When we define a feature to design, we use a MVF approach (Minimally Viable Feature). This means that we look at the minimum requirements needed for a specific feature, and design just that. Once implemented and live, we gather end-user feedback and improve that feature based on users’ experience. In order to achieve quality, there’s a need for quantity, and implementing a MVF approach or creating interactive prototypes are feasible ways to achieve an iterative process towards a successful user-centred end-product. We walk through the entire process of conceptualization, in which we define, measure, and validate a concept together with the stakeholders and audience using prototypes. This way, we aim to create innovative, sustainable, and scalable software that’s continuously adaptable to the changing needs and demands of our clients and end-users. Our clickable demos and wireframes are easy to create and adapt, which we do together with our client and end-users. This forms a powerful and unique co-creating atmosphere among all stakeholders, and guarantees an end-product that’s tailored to and aligned with the vision of our clients and users. Within our rapid prototyping processes, we combine our MVF approach with iterative A/B testing to measure the effects of our products among two groups of users in order to get a concrete idea of what works, what needs improvement, and what new features are needed. Rapid prototyping leads to rapid application development (RAD), which allows us to quickly and efficiently add value following our Agile way of working.


Stuck between a great idea and the right team to build it?Let's talk.
We work with corporate innovation teams and ambitious scale-ups across the Netherlands, Singapore, and Australia, and wherever great software needs to be built. Drop us a message and we'll get back to you within one business day.


Markus Monnikendam
Global Commercial Director
hello@lizard.global